16 KiB
A slow tour through Mu software on x86 computers
Mu shrinks all the software in a computer until it can (in principle) fit in a single head. Sensible error messages with as little code as possible, starting all the way from your (x86) processor's instruction set. Everything easy to change to your needs (habitable), everything easy to check up on (auditable).
This page is a guided tour through Mu's Readme and reference documentation. We'll start out really slow and gradually accelerate as we build up skills. By the end of it all, I hope you'll be able to program your processor to run some small graphical programs. The programs will only use a small subset of your computer's capabilities; there's still a lot I don't know and therefore cannot teach. However, the programs will run on a real processor without needing any other intermediary software.
Prerequisites
You will need:
- A computer with an x86 processor running Linux. We're going to slowly escape Linux, but we'll need it at the start. Mu works on other platforms, but be warned that things will be much (~20x) slower.
- Some fluency in typing commands at the terminal and interpreting their output.
- Fluency with some text editor. Things like undo, copying and pasting text, and saving work in files. A little experience programming in some language is also handy.
- Git for version control.
- QEMU for emulating a processor without Linux.
- Basic knowledge of number bases, and the difference between decimal and hexadecimal numbers.
- Basic knowledge of the inside of a processor, such as the difference between a small number of registers and a large number of locations in memory.
If you have trouble with any of this, I'm always nearby and available to answer questions. The prerequisites are just things I haven't figured out how to explain yet. In particular, I want this page to be accessible to people who are in the process of learning programming, but I'm sure it isn't good enough yet for that. Ask me questions and help me improve it.
Task 1: getting started
Open a terminal and run the following commands to prepare Mu on your computer:
git clone https://github.com/akkartik/mu
cd mu
Run a small program to start:
./translate tutorial/task1.mu
qemu-system-i386 code.img
If you aren't on Linux, the command for creating code.img will be slightly
different:
./translate_emulated tutorial/task1.mu
qemu-system-i386 code.img
Either way, you should see this:
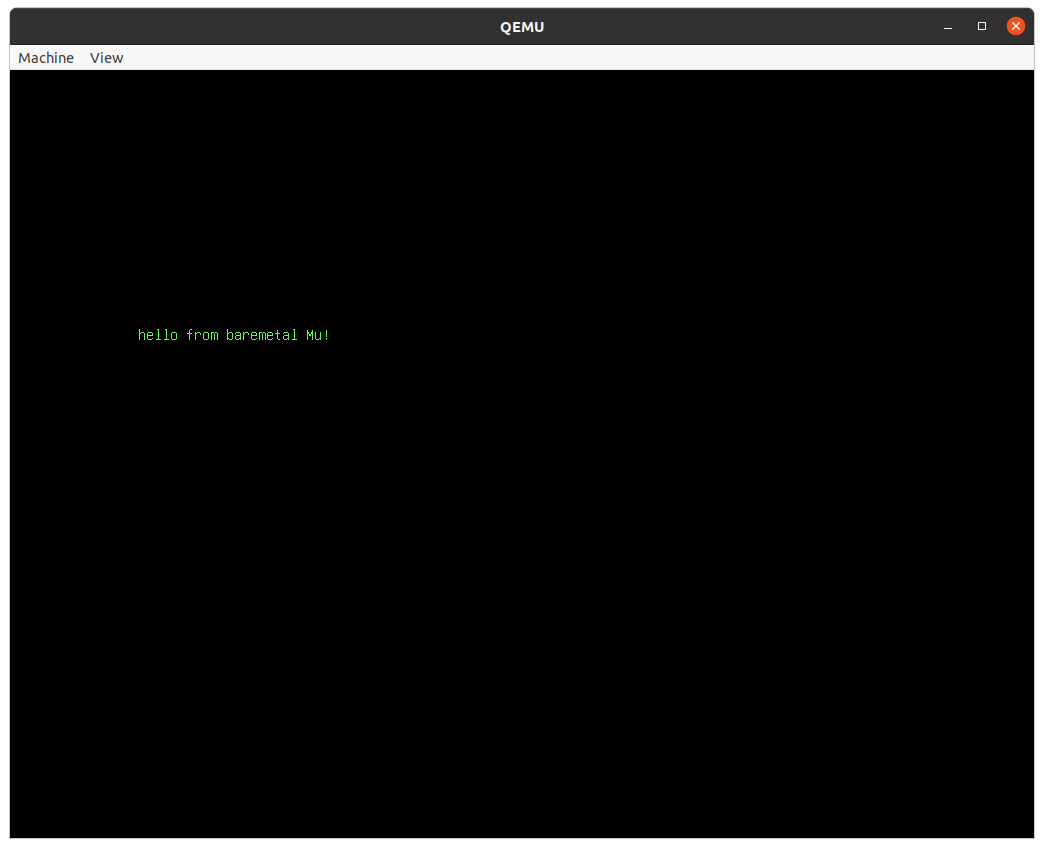
If you have any trouble at this point, don't waste any time thinking about it. Just get in touch.
(You can look at tutorial/task1.mu at this point if you like. It's just 3
lines long. But don't worry if it doesn't make much sense.)
Task 2: running tests
Here's a new program to run:
./translate tutorial/task2.mu
qemu-system-i386 code.img
(As before, I'll leave you to substitute translate with translate_emulated
if you're not on Linux.)
This time the screen will look like this:

Each of the dots represents a test, a little self-contained and automated program run and its results verified. Mu comes with a lot of tests (every function starting with 'test-' is a test), and it always runs all tests on boot before it runs any program. You may have missed the dots when you ran Task 1 because there were no failures. They were printed on the screen and then immediately erased. In Task 2, however, we've deliberately included a failing test. When any tests fail, Mu will immediately stop, showing you messages from failing tests and implicitly asking you to first fix them.
(Don't worry just yet about what the message in the middle of all the dots means.)
Task 3: configure your text editor
So far we haven't used a text editor yet, but we will now be starting to do
so. Before we do, it's worth spending a little bit of time setting your
preferred editor up to be a little more ergonomic. Mu comes with syntax
highlighting settings for a few common text editors in the editor/
sub-directory. If you don't see your text editor there, or if you don't know
what to do with those files, get in touch!
Here's what my editor (Vim) looks like with these settings on the program of
Task 1:
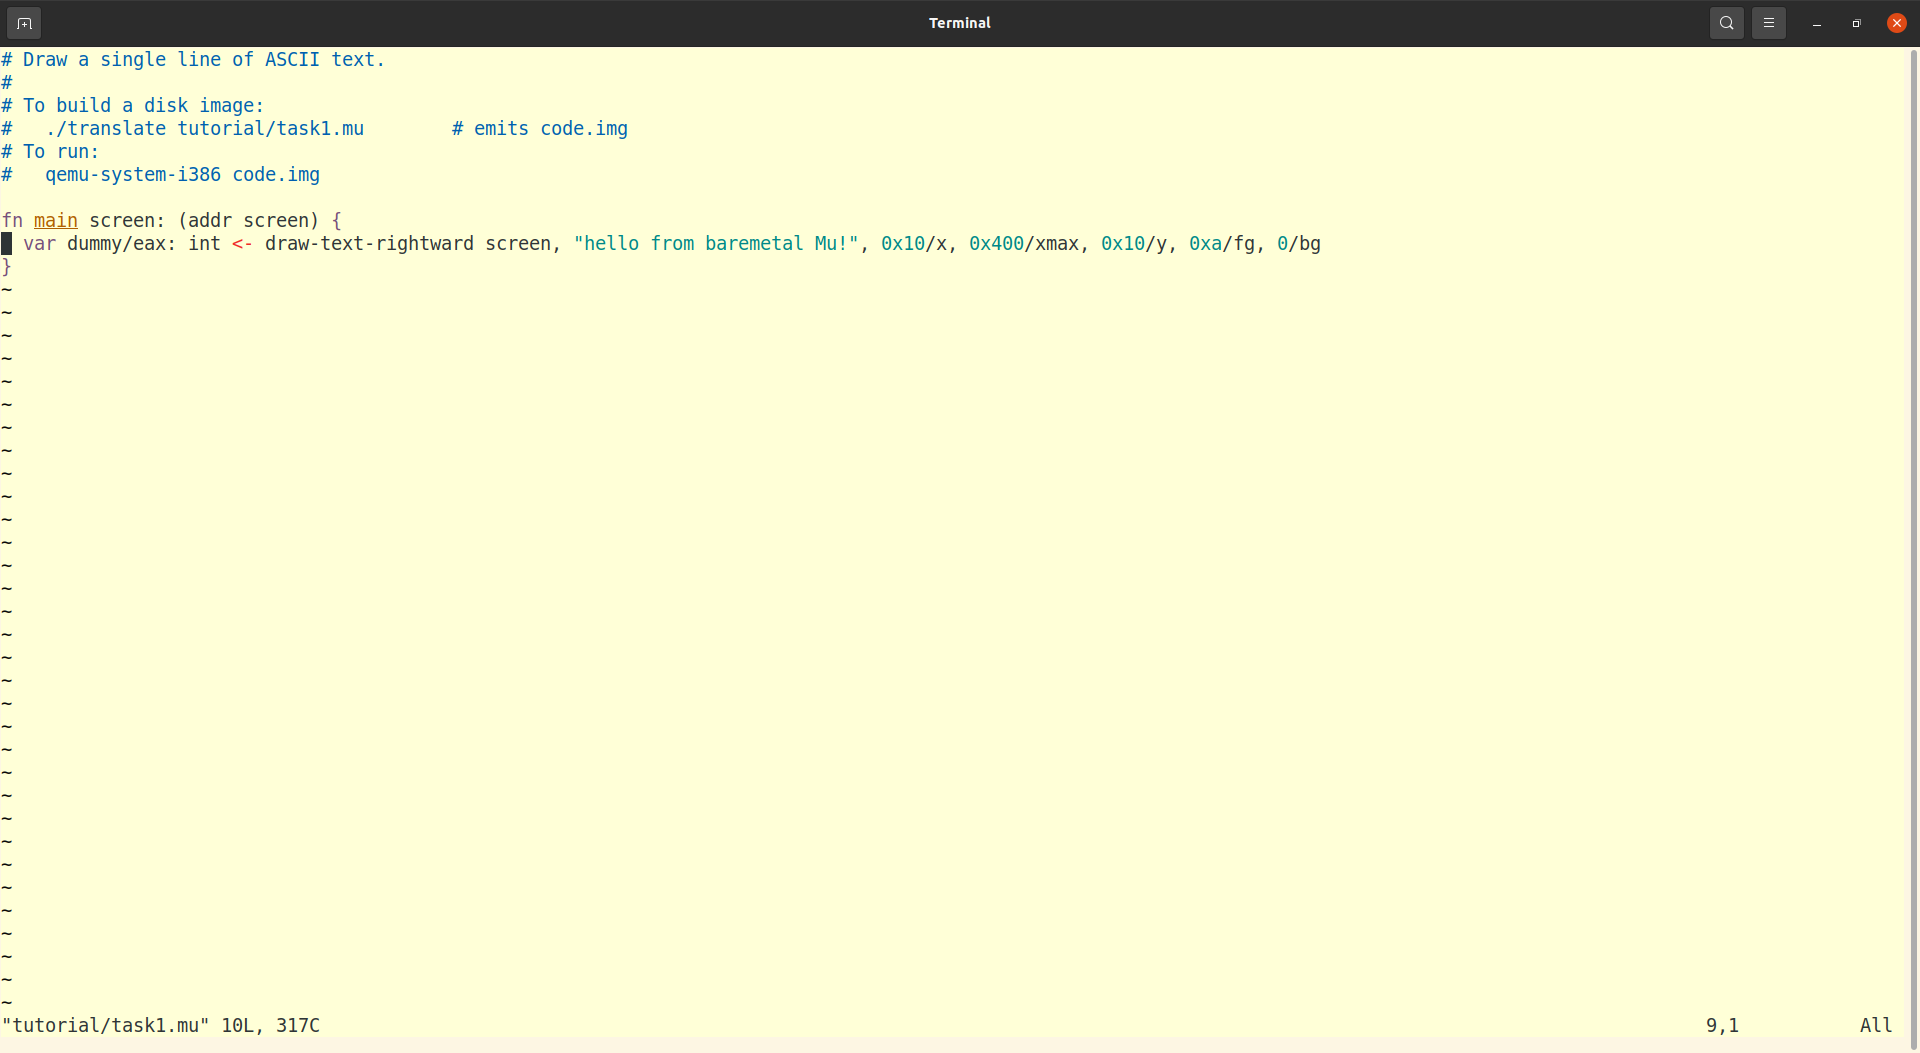
It's particularly useful to highlight comments which the computer ignores
(everything on a line after a # character) and strings within "" double
quotes.
Task 4: your first Mu statement
Mu is a statement-oriented language. Most statements translate into a single instruction to the x86 processor. Quickly read the first two sections of the Mu reference (about functions and variables) to learn a little bit about it. It's ok if it doesn't all make sense just yet. We'll reread it later.
Here's a skeleton of a Mu function that's missing a single statement.
fn the-answer -> _/eax: int {
  var result/eax: int <- copy 0
  # insert your statement below {

  # }
  return result
}
Try running it now:
./translate tutorial/task4.mu
qemu-system-i386 code.img
(As before, I'll leave you to substitute translate with translate_emulated
if you're not on Linux.)
You should see a failing test that looks something like this:

Open tutorial/task4.mu in your text editor. Think about how to add a line
between the {} lines to make the-answer return 42. Rerun the above
commands. You'll know you got it right when all the tests pass, i.e. when the
rows of dots and text above are replaced by an empty screen.
Don't be afraid to run the above commands over and over again as you try out different solutions. Here's a way to run them together so they're easy to repeat.
./translate tutorial/task4.mu && qemu-system-i386 code.img
In programming there is no penalty for making mistakes, and once you arrive at the correct solution you have it forever. As always, feel free to ping me and ask questions or share your experience.
Mu statements can have outputs on the left (before the <-) and inouts
(either inputs or outputs) on the right, after the instruction name. The order
matters.
One gotcha to keep in mind is that numbers in Mu must always be in hexadecimal
notation, starting with 0x. Use a calculator on your computer or phone to
convert 42 to hexadecimal, or this page on your web browser.
Task 5: variables in registers, variables in memory
We'll now practice managing one variable in a register (like last time) and a second one in memory. To prepare for this, reread the first two sections of the Mu reference. The section on integer arithmetic also provides a useful cheatsheet of the different forms of instructions you will need.
Here's the exercise, with comments starting with # highlighting the gaps in
the program:
fn foo -> _/eax: int {
  var x: int
  # statement 1: store 3 in x
  # statement 2: define a new variable 'y' in register eax and store 4 in it
  # statement 3: add y to x, storing the result in x
  return x
}
Again, you're encouraged to repeatedly try out your programs by running this command as often as you like:
./translate tutorial/task5.mu && qemu-system-i386 code.img
The section on integer arithmetic shows that Mu consistently follows a few rules:
- Instructions that write to a register always have an output before the
<-. - Instructions that use an argument in memory always have it as the first inout.
- Instructions that write to memory have a preposition in their name. Contrast
addto a register vsadd-toa memory location,subtractfrom a register vssubtract-froma memory location, and so on.
If you're stuck, as always, my door is open. You can also see a solution in the repository, though I won't link to it lest it encourage peeking.
Where possible, try to store variables in registers rather than the stack. The two main reasons to use the stack are:
- when you need lots of variables and run out of registers, and
- when you have types that don't fit in 32 bits.
Task 6: getting used to a few error messages
If you're like me, seeing an error message can feel a bit stressful. It usually happens when you're trying to get somewhere, it can feel like the computer is being deliberately obtrusive, there's uncertainty about what's wrong.
Well, I'd like to share one trick I recently learned to stop fearing error messages: deliberately trigger them at a time and place of your choosing, when you're mentally prepared to see them. That takes the stress right out.
Here's the skeleton for tutorial/task6.mu:
fn main {
  var m: int
  var r/edx: int <- copy 0
  # insert a single statement below

}
(Reminder: m here is stored somewhere in memory, while r is stored in
register edx. Variables in registers must always be initialized when they're
created. Variables in memory must never be initialized, because they're always
implicitly initialized to 0.)
Now, starting from this skeleton, type the following statements in, one at a time. Your program should only ever have one more statement than the above skeleton. We'll try out the following statements, one by one:
m <- copy 3r <- copy 3copy-to r, 3copy-to m, 3
Before typing in each one, write down whether you expect an error. After trying it out, compare your answer. It can also be useful to write down the exact error you see, and what it means, in your own words.
(Also, don't forget to delete the statement you typed in before you move on to trying out the next one.)
Making notes about error messages is an example of a more general trick called a runbook. Runbooks are aids to memory, scripts for what to do when you run into a problem. People think worse in the presence of stress, and runbooks can help reduce the need for thinking in the presence of stress. They're a way of programming people (your future self or others) rather than computers.
Task 7: variables in registers, variables in memory (again)
Go back to your program in Task 5. Replace the first statement declaring
variable x:
var x: int
so it looks like this:
var x/edx: int <- copy 0
Run translate (or translate_emulated) as usual. Use your runbook from Task
6 to address the errors that arise.
Task 8: primitive statements vs function calls
Managing variables in memory vs register is one of two key skills to programming in Mu. The second key skill is calling primitives (which are provided by the x86 instruction set) vs functions (which are defined in terms of primitives).
To prepare for this task, reread the very first section of the Mu reference, on functions and function calls.
Now look at the following programs. In each case, write down whether you expect translation to return any errors and why.
fn f a: int {
}

fn main {
  f 0
  var r/eax: int <- copy 3
  f r
  var m: int
  f m
}
(When you're ready, try the above program out as ./translate tutorial/task8a.mu.)
fn f -> _/eax: int {
  var result/ecx: int <- copy 0
  return result
}

fn main {
  var x/eax: int <- f
}
(When you're ready, try the above program out as ./translate tutorial/task8b.mu.)
fn f -> _/eax: int {
  return 3
}

fn main {
  var x/ecx: int <- f
}
(When you're ready, try the above program out as ./translate tutorial/task8c.mu.)
Functions have fewer restrictions than primitives on inouts, but more restrictions on outputs. Inouts can be registers, or memory, or even literals. This is why the first example above is legal. Outputs, however, must hard-code specific registers, and function calls must write their outputs to matching registers. This is why the third example above is illegal.
One subtlety here is that we only require agreement on output registers
between function call and function header. We don't actually have to return
the precise register a function header specifies. The return value can even be
a literal integer or in memory somewhere. The return is really just a copy
to the appropriate register(s). This is why the second example above is legal.
Task 9: juggling registers between function calls
Here's a program:
fn f -> _/eax: int {
  return 2
}

fn g -> _/eax: int {
  return 3
}

fn add-f-and-g -> _/eax: int {
  var x/eax: int <- f
  var y/eax: int <- g
  x <- add y
  return x
}
What's wrong with this program? How can you fix it and pass all tests by
modifying just function add-f-and-g?
By convention, most functions in Mu return their results in register eax.
That creates a fair bit of contention for this register, and we often end up
having to move the output of a function call around to some other location to
free up space for the next function we need to call.
An alternative approach would be to distribute the load between registers so
that different functions use different output registers. That would reduce the
odds of conflict, but not eradicate them entirely. It would also add some
difficulty in calling functions; now you have to remember what register they
write their outputs to. It's unclear if the benefits of this alternative
outweigh the costs, so Mu follows long-established conventions in other
Assembly languages. I do, however, violate the eax convention in some cases
where a helper function is only narrowly useful in a single sort of
circumstance and registers are at a premium. See, for example, the definition
of the helper _read-dithering-error when rendering images.
The leading underscore indicates that it's an internal detail of
render-image, and not really intended to be called by itself.
Task 10: operating with fractional numbers
All our variables so far have had type int (integer), but there are limits
to what you can do with just whole integers. For example, here's the formula
a visitor to the US will require to convert distances mentioned on road signs
from miles to kilometers:
distance * 1.609
Write a function to perform this conversion. Some starting points:
- Reread the section on variables and registers
with special attention to the
floattype. - Read the section on fractional arithmetic.
- One wrinkle is that the x86 instruction set doesn't permit literal fractional arguments. So you'll need to create 1.609 somehow. See the section on moving values around under operations on simple types.
This task has four source files in the repo that reveal more and more of the answer. Start from the first, and bump down if you need a hint.
- tutorial/task10.mu
- tutorial/task10-hint1.mu
- tutorial/task10-hint2.mu
- tutorial/task10-hint3.mu