26 KiB
SubX: a simplistic assembly language
SubX is a minimalist assembly language designed:
- to explore ways to turn arbitrary manual tests into reproducible automated tests,
- to be easy to implement in itself, and
- to help learn and teach the x86 instruction set.
$ git clone https://github.com/akkartik/mu
$ cd mu/subx
$ ./subx  # print out a help message

Expanding on the first bullet, it hopes to support more comprehensive tests by:
-
Running generated binaries in emulated mode. Emulated mode is slower than native execution (which will also work), but there's more sanity checking, and more descriptive error messages for common low-level problems.
$ ./subx translate examples/ex1.subx -o examples/ex1
$ ./examples/ex1  # only on Linux
$ echo $?
42
$ ./subx run examples/ex1  # on Linux or BSD or OS X
$ echo $?
42
The assembly syntax is designed so the assembler (
subx translate) has very little to do, making it feasible to reimplement in itself. Programmers have to explicitly specify all opcodes and operands.# exit(42) bb/copy-to-EBX 0x2a/imm32 # 42 in hex b8/copy-to-EAX 1/imm32/exit cd/syscall 0x80/imm8To keep code readable you can add metadata to any word after a
/. Metadata can be just comments for readers, and they'll be ignored. They can also trigger checks. Here, tagging operands with theimm32type allows SubX to check that instructions have precisely the operand types they should. x86 instructions have 14 types of operands, and missing one causes all future instructions to go off the rails, interpreting operands as opcodes and vice versa. So this is a useful check. -
Designing testable wrappers for operating system interfaces. For example, it can
read()from orwrite()to fake in-memory files in tests. More details below. We are continuing to port syscalls from the old Mu VM in the parent directory. -
Supporting a special trace stream in addition to the default
stdin,stdoutandstderrstreams. The trace stream is designed for programs to emit structured facts they deduce about their domain as they execute. Tests can then check the set of facts deduced in addition to the results of the function under test. This form of automated whitebox testing permits writing tests for performance, fault tolerance, deadlock-freedom, memory usage, etc. For example, if a sort function traces each swap, a performance test could check that the number of swaps doesn't quadruple when the size of the input doubles.
The hypothesis is that designing the entire system to be testable from day 1 and from the ground up would radically impact the culture of an eco-system in a way that no bolted-on tool or service at higher levels can replicate. It would make it easier to write programs that can be easily understood by newcomers. It would reassure authors that an app is free from regression if all automated tests pass. It would make the stack easy to rewrite and simplify by dropping features, without fear that a subset of targeted apps might break. As a result people might fork projects more easily, and also exchange code between disparate forks more easily (copy the tests over, then try copying code over and making tests pass, rewriting and polishing where necessary). The community would have in effect a diversified portfolio of forks, a “wavefront” of possible combinations of features and alternative implementations of features instead of the single trunk with monotonically growing complexity that we get today. Application writers who wrote thorough tests for their apps (something they just can’t do today) would be able to bounce around between forks more easily without getting locked in to a single one as currently happens.
However, that vision is far away, and SubX is just a first, hesitant step. SubX supports a small, regular subset of the 32-bit x86 instruction set. (Think of the name as short for "sub-x86".)
-
Only instructions that operate on the 32-bit integer E*X registers, and a couple of instructions for operating on 8-bit values. No floating-point yet. Most legacy registers will never be supported.
-
Only instructions that assume a flat address space; legacy instructions that use segment registers will never be supported.
-
No instructions that check the carry or parity flags; arithmetic operations always operate on signed integers (while bitwise operations always operate on unsigned integers).
-
Only relative jump instructions (with 8-bit or 32-bit offsets).
The (rudimentary, statically linked) ELF binaries SubX generates can be run natively on Linux, and they require only the Linux kernel.
Status
I'm currently implementing SubX in SubX in 3 phases:
- Converting ascii hex bytes to binary. (✓)
- Packing bitfields for x86 instructions into bytes. (80% complete)
- Replacing addresses with labels.
In parallel, I'm designing testable wrappers for syscalls, particularly for scalably running blocking syscalls with a test harness concurrently monitoring their progress.
An example program
In the interest of minimalism, SubX requires more knowledge than traditional assembly languages of the x86 instructions it supports. Here's an example SubX program, using one line per instruction:
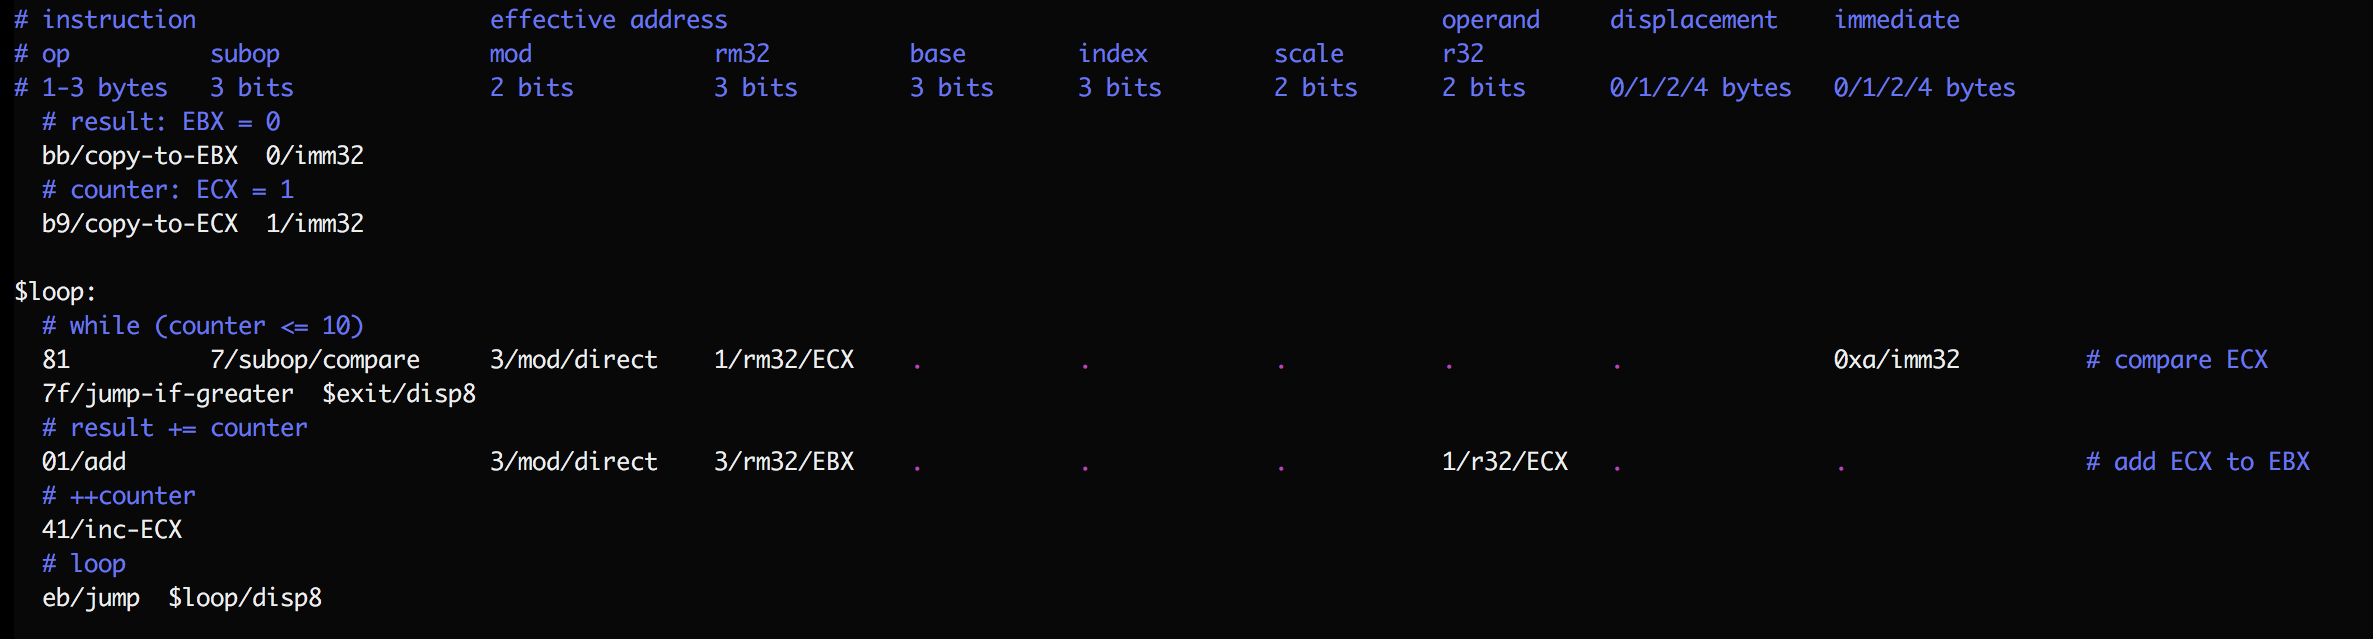
This program sums the first 10 natural numbers. By convention I use horizontal tabstops to help read instructions, dots to help follow the long lines, comments before groups of instructions to describe their high-level purpose, and comments at the end of complex instructions to state the low-level operation they perform. Numbers are always in hexadecimal (base 16); the '0x' prefix is optional, and I tend to include it as a reminder when numbers look like decimal numbers or words.
As you can see, programming in SubX requires the programmer to know the (kinda
complex) structure of x86 instructions, all the different operands that an
instruction can have, their layout in bytes (for example, the subop and
r32 fields use the same bits, so an instruction can't have both; more on
this below), the opcodes for supported instructions, and so on.
While SubX syntax is fairly dumb, the error-checking is relatively smart. I try to provide clear error messages on instructions missing operands or having unexpected operands. Either case would otherwise cause instruction boundaries to diverge from what you expect, and potentially lead to errors far away. It's useful to catch such errors early.
Try running this example now:
$ ./subx translate examples/ex3.subx -o examples/ex3
$ ./subx run examples/ex3
$ echo $?
55
If you're on Linux you can also run it natively:
$ ./examples/ex3
$ echo $?
55
The rest of this Readme elaborates on the syntax for SubX programs, starting with a few prerequisites about the x86 instruction set.
A quick tour of the x86 instruction set
The Intel processor manual is the final source of truth on the x86 instruction set, but it can be forbidding to make sense of, so here's a quick orientation. You will need familiarity with binary and hexadecimal encodings (starting with '0x') for numbers, and maybe a few other things. Email me any time if something isn't clear. I love explaining this stuff for as long as it takes.
The x86 instructions SubX supports can take anywhere from 1 to 13 bytes. Early bytes affect what later bytes mean and where an instruction ends. Here's the big picture of a single x86 instruction from the Intel manual:
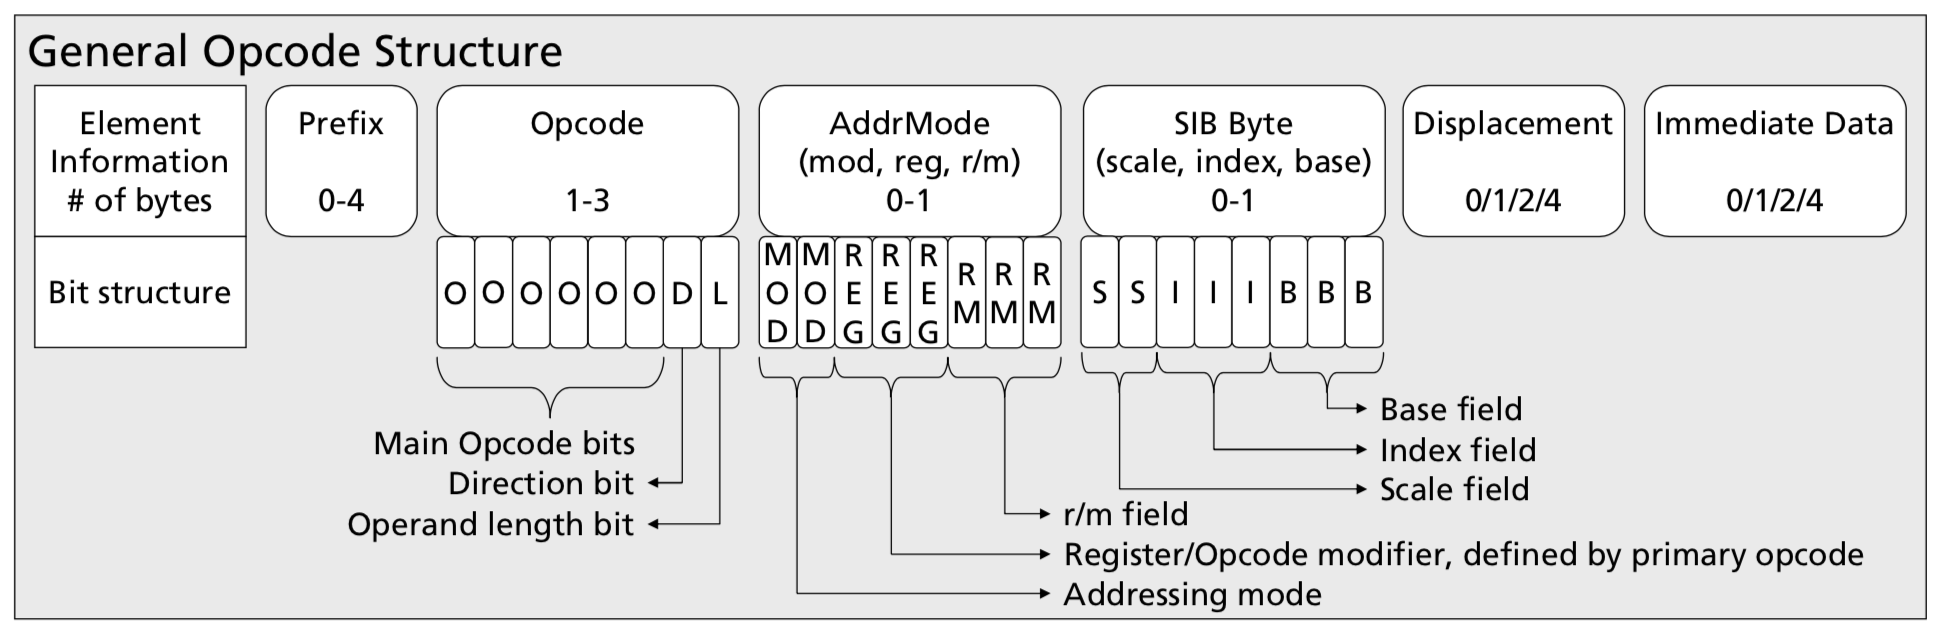
There's a lot here, so let's unpack it piece by piece:
-
The prefix bytes are not used by SubX, so ignore them.
-
The opcode bytes encode the instruction used. Ignore their internal structure; we'll just treat them as a sequence of whole bytes. The opcode sequences SubX recognizes are enumerated by running
subx help opcodes. For more details on a specific opcode, consult html guides like https://c9x.me/x86 or the Intel manual. -
The addressing mode byte is used by all instructions that take an
rm32operand according tosubx help opcodes. (That's most instructions.) Therm32operand expresses how an instruction should load one 32-bit operand from either a register or memory. It is configured by the addressing mode byte and, optionally, the SIB (scale, index, base) byte as follows:-
if the
mod(mode) field is11(3): therm32operand is the contents of the register described by ther/mbits.000(0) means registerEAX001(1) means registerECX010(2) means registerEDX011(3) means registerEBX100(4) means registerESP101(5) means registerEBP110(6) means registerESI111(7) means registerEDI
-
if
modis00(0):rm32is the contents of the address provided in the register provided byr/m. That's*r/min C syntax. -
if
modis01(1):rm32is the contents of the address provided by adding the register inr/mwith the (1-byte) displacement. That's*(r/m + disp8)in C syntax. -
if
modis10(2):rm32is the contents of the address provided by adding the register inr/mwith the (4-byte) displacement. That's*(r/m + disp32)in C syntax.
In the last 3 cases, one exception occurs when the
r/mfield contains010(4). Rather than encoding register ESP, that means the address is provided by a SIB byte next:base + index * 2^scale + displacement(There are a couple more exceptions ☹; see Table 2-2 and Table 2-3 of the Intel manual for the complete story.)
Phew, that was a lot to take in. Some examples to work through as you reread and digest it:
-
To read directly from the EAX register,
modmust be11(direct mode), and ther/mbits must be000(EAX). There must be no SIB byte. -
To read from
*EAXin C syntax,modmust be00(indirect mode), and ther/mbits must be000. There must be no SIB byte. -
To read from
*(EAX+4),modmust be01(indirect + disp8 mode),r/mmust be000, there must be no SIB byte, and there must be a single displacement byte containing00000010(4). -
To read from
*(EAX+ECX+4), one approach would be to setmodto01,r/mto100(SIB byte next),baseto000,indexto001(ECX) and a single displacement byte to 4. What should thescalebits be? Can you think of another approach? -
To read from
*(EAX+ECX+0x00f00000), one approach would be:mod:10(indirect + disp32)r/m:100(SIB byte)base:000(EAX)index:001(ECX)displacement: 4 bytes containing 0x00f00000
-
-
Back to the instruction picture. We've already covered the SIB byte and most of the addressing mode byte. Instructions can also provide a second operand as either a displacement or immediate value (the two are distinct because some instructions use a displacement as part of
rm32and an immediate for the other operand). -
Finally, the
regbits in the addressing mode byte can also encode the second operand. Sometimes they can also be part of the opcode bits. For example, an operand byte offfandregbits of001means "increment rm32". (Notice that instructions that use theregbits as a "sub-opcode" cannot also use it as a second operand.)
That concludes our quick tour. By this point it's probably clear to you that the x86 instruction set is overly complicated. Many simpler instruction sets exist. However, your computer right now likely runs x86 instructions and not them. Internalizing the last 750 words may allow you to program your computer fairly directly, with only minimal-going-on-zero reliance on a C compiler.
The syntax of SubX programs
SubX programs map to the same ELF binaries that a conventional Linux system
uses. Linux ELF binaries consist of a series of segments. In particular, they
distinguish between code and data. Correspondingly, SubX programs consist of a
series of segments, each starting with a header line: == followed by a name.
The first segment must be named code; the second must be named data.
Execution begins at the start of the code segment by default.
You can reuse segment names:
== code
...A...

== data
...B...

== code
...C...
The code segment now contains the instructions of A as well as C.
Within the code segment, each line contains a comment, label or instruction.
Comments start with a # and are ignored. Labels should always be the first
word on a line, and they end with a :.
Instructions consist of a sequence of words. As mentioned above, each word can
contain metadata after a /. Metadata can be either required by SubX or act
as a comment for the reader; SubX silently ignores unrecognized metadata. A
single word can contain multiple pieces of metadata, each starting with a /.
The words in an instruction consist of 1-3 opcode bytes, and different kinds of operands corresponding to the bitfields in an x86 instruction listed above. For error checking, these operands must be tagged with one of the following bits of metadata:
modrm32("r/m" in the x86 instruction diagram above, but we can't use/in metadata tags)r32("reg" in the x86 diagram)subop(for when "reg" in the x86 diagram encodes a sub-opcode rather than an operand)- displacement:
disp8,disp16ordisp32 - immediate:
imm8orimm32
Different instructions (opcodes) require different operands. SubX will validate each instruction in your programs, and raise an error anytime you miss or spuriously add an operand.
I recommend you order operands consistently in your programs. SubX allows operands in any order, but only because that's simplest to explain/implement. Switching order from instruction to instruction is likely to add to the reader's burden. Here's the order I've been using:
/subop /mod /rm32 /base /index /scale /r32 /displacement /immediate
Instructions can refer to labels in displacement or immediate operands, and
they'll obtain a value based on the address of the label: immediate operands
will contain the address directly, while displacement operands will contain
the difference between the address and the address of the current instruction.
The latter is mostly useful for jump and call instructions.
Functions are defined using labels. By convention, labels internal to functions
(that must only be jumped to) start with a $. Any other labels must only be
called, never jumped to. All labels must be unique.
A special label is Entry, which can be used to specify/override the entry
point of the program. It doesn't have to be unique, and the latest definition
will override earlier ones.
(The Entry label, along with duplicate segment headers, allows programs to
be built up incrementally out of multiple layers](http://akkartik.name/post/wart-layers).)
The data segment consists of labels as before and byte values. Referring to
data labels in either code segment instructions or data segment values
(using the imm32 metadata either way) yields their address.
Automatic tests are an important part of SubX, and there's a simple mechanism
to provide a test harness: all functions that start with test- are called in
turn by a special, auto-generated function called run-tests. How you choose
to call it is up to you.
I try to keep things simple so that there's less work to do when I eventually
implement SubX in SubX. But there is one convenience: instructions can
provide a string literal surrounded by quotes (") in an imm32 operand.
SubX will transparently copy it to the data segment and replace it with its
address. Strings are the only place where a SubX operand is allowed to contain
spaces.
That should be enough information for writing SubX programs. The examples/
directory provides some fodder for practice, giving a more gradual introduction
to SubX features. This repo includes the binary for all examples. At any
commit, an example's binary should be identical bit for bit with the result of
translating the corresponding .subx file. The binary should also be natively
runnable on a Linux system running on Intel x86 processors, either 32- or
64-bit. If either of these invariants is broken it's a bug on my part.
Running
Running subx will transparently compile it as necessary.
subx currently has the following sub-commands:
-
subx help: some helpful documentation to have at your fingertips. -
subx test: runs all automated tests. -
subx translate <input files> -o <output ELF binary>: translates.subxfiles into an executable ELF binary. -
subx run <ELF binary>: simulates running the ELF binaries emitted bysubx translate. Useful for debugging, and also enables more thorough testing oftranslate.Remember, not all 32-bit Linux binaries are guaranteed to run. I'm not building general infrastructure here for all of the x86 instruction set. SubX is about programming with a small, regular subset of 32-bit x86.
A few hints for debugging
Writing programs in SubX is surprisingly pleasant and addictive. Reading programs is a work in progress, and hopefully the extensive unit tests help. However, debugging programs is where one really faces up to the low-level nature of SubX. Even the smallest modifications need testing to make sure they work. In my experience, there is no modification so small that I get it working on the first attempt. And when it doesn't work, there are no clear error messages. Machine code is too simple-minded for that. You can't use a debugger, since SubX's simplistic ELF binaries contain no debugging information. So debugging requires returning to basics and practicing with a new, more rudimentary but hopefully still workable toolkit:
-
Start by nailing down a concrete set of steps for reproducibly obtaining the error or erroneous behavior.
-
If possible, turn the steps into a failing test. It's not always possible, but SubX's primary goal is to keep improving the variety of tests one can write.
-
Start running the single failing test alone. This involves modifying the top of the program (or the final
.subxfile passed in tosubx translate) by replacing the call torun-testswith a call to the appropriatetest-function. -
Generate a trace for the failing test while running your program in emulated mode (
subx run):$ ./subx translate input.subx -o binary $ ./subx --trace run binary arg1 arg2 2>traceThe ability to generate a trace is the essential reason for the existence of
subx runmode. It gives far better visibility into program internals than running natively. -
As a further refinement, it is possible to render label names in the trace by adding a second flag to both the
translateandruncommands:$ ./subx --map translate input.subx -o binary $ ./subx --map --trace run binary arg1 arg2 2>tracesubx --map translateemits a mapping from label to address in a file calledmap.subx --map --trace runreads in themapfile at the start and prints out any matching label name as it traces each instruction executed.Here's a sample of what a trace looks like, with a few boxes highlighted:
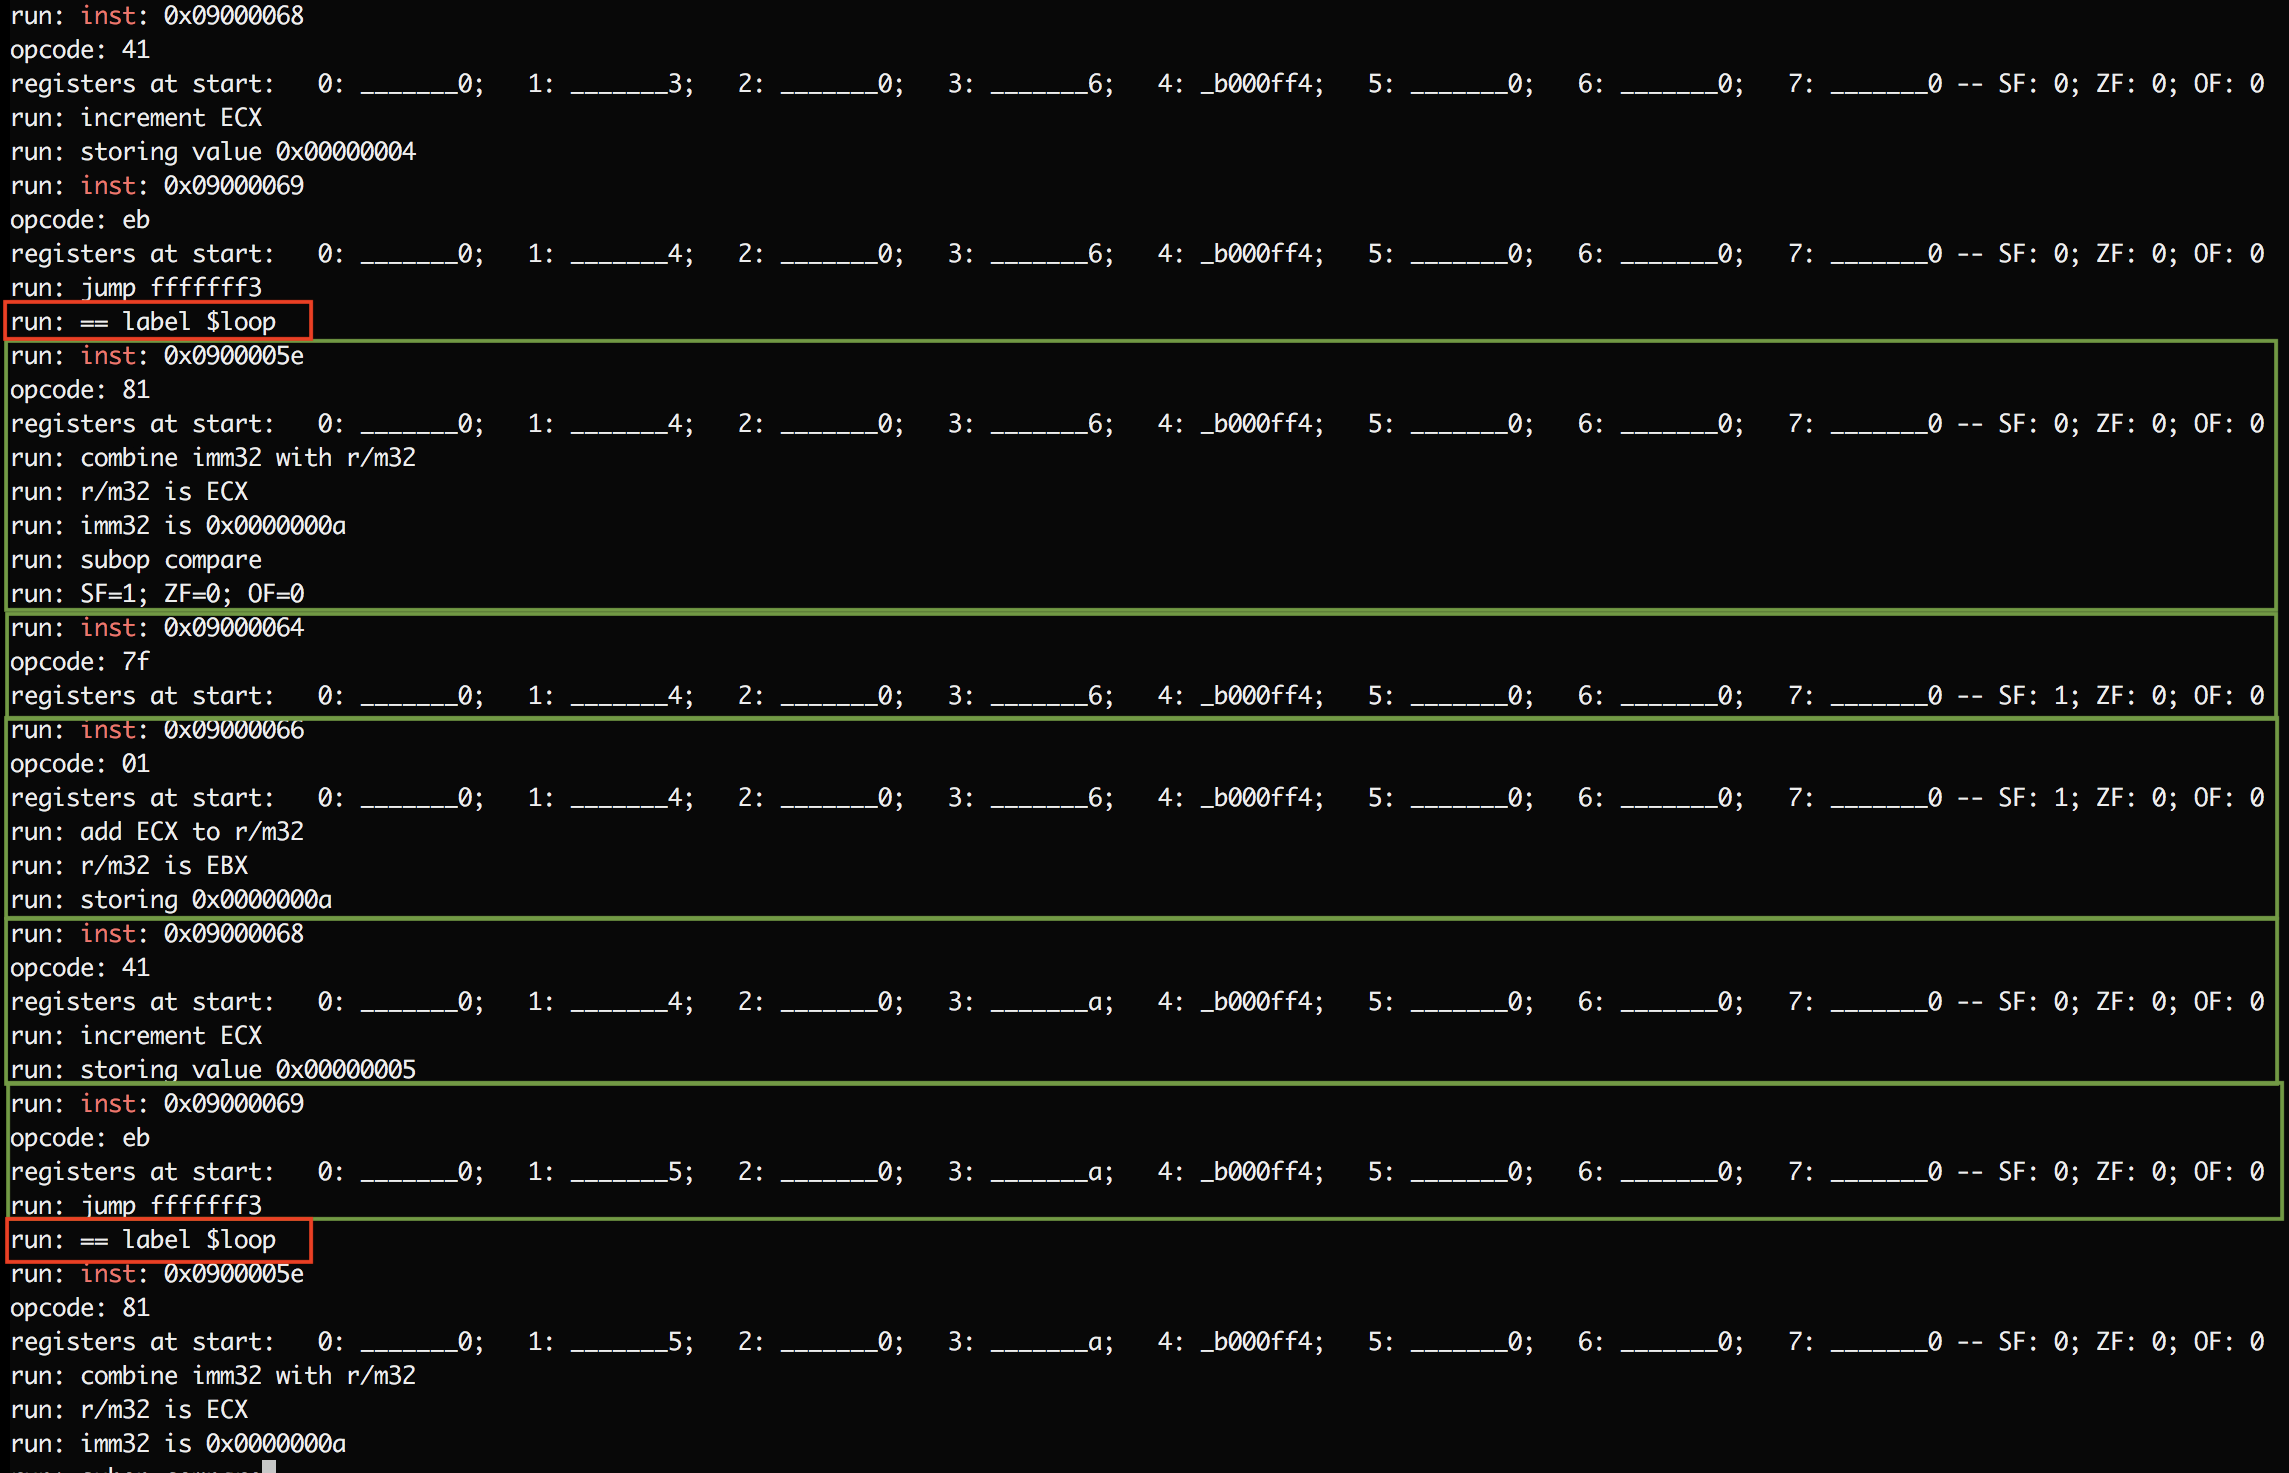
Each of the green boxes shows the trace emitted for a single instruction. It starts with a line of the form
run: inst: ___followed by the opcode for the instruction, the state of registers before the instruction executes, and various other facts deduced during execution. Some instructions first print a matching label. In the above screenshot, the red boxes show that address0x0900005emaps to label$loopand presumably marks the start of some loop. Function names get similarrun: == labellines. -
One trick when emitting traces with labels:
$ grep label traceThis is useful for quickly showing you the control flow for the run, and the function executing when the error occurred. I find it useful to start with this information, only looking at the complete trace after I've gotten oriented on the control flow. Did it get to the loop I just modified? How many times did it go through the loop?
-
Once you have SubX displaying labels in traces, it's a short step to modify the program to insert more labels just to gain more insight. For example, consider the following function:
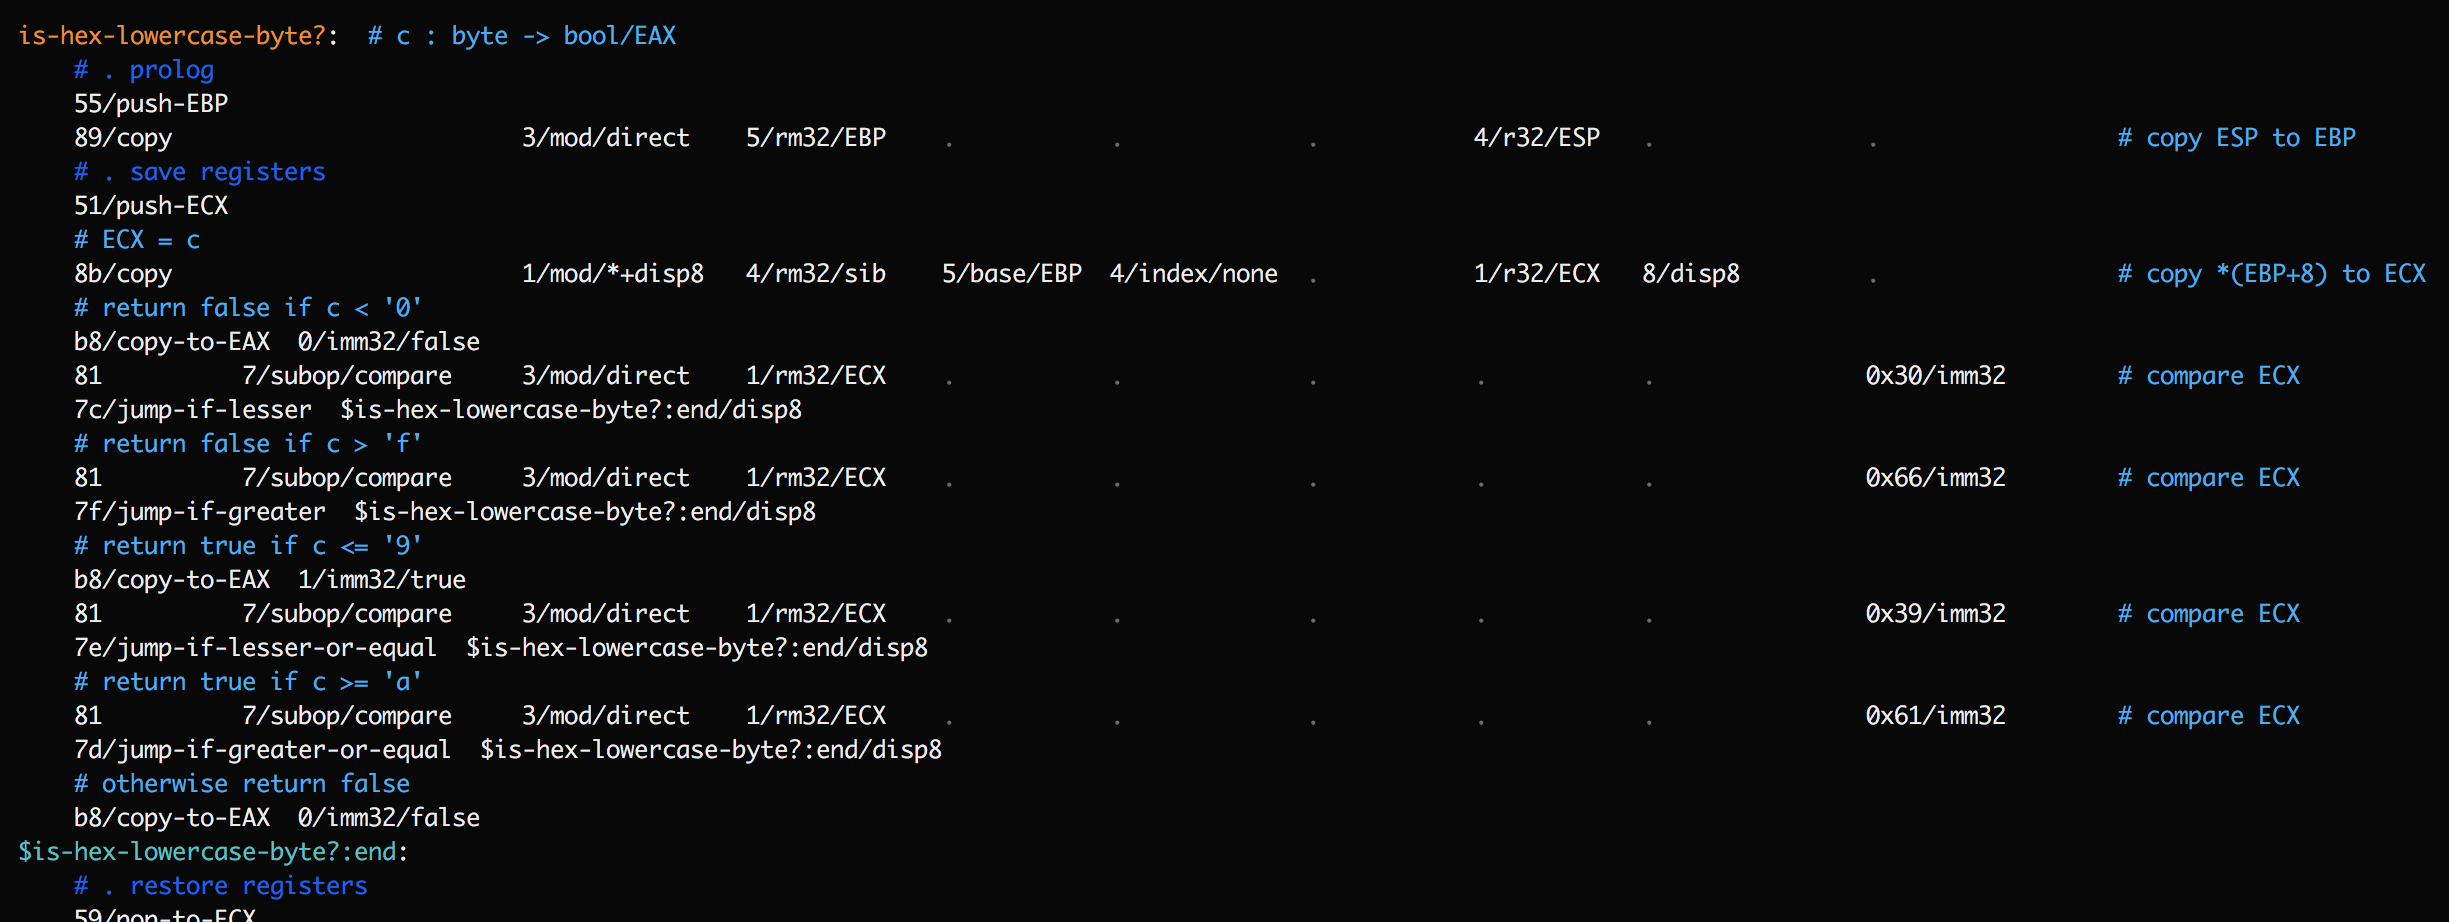
This function contains a series of jump instructions. If a trace shows
is-hex-lowercase-byte?being encountered, and then$is-hex-lowercase-byte?:endbeing encountered, it's still ambiguous what happened. Did we hit an early exit, or did we execute all the way through? To clarify this, add temporary labels after each jump: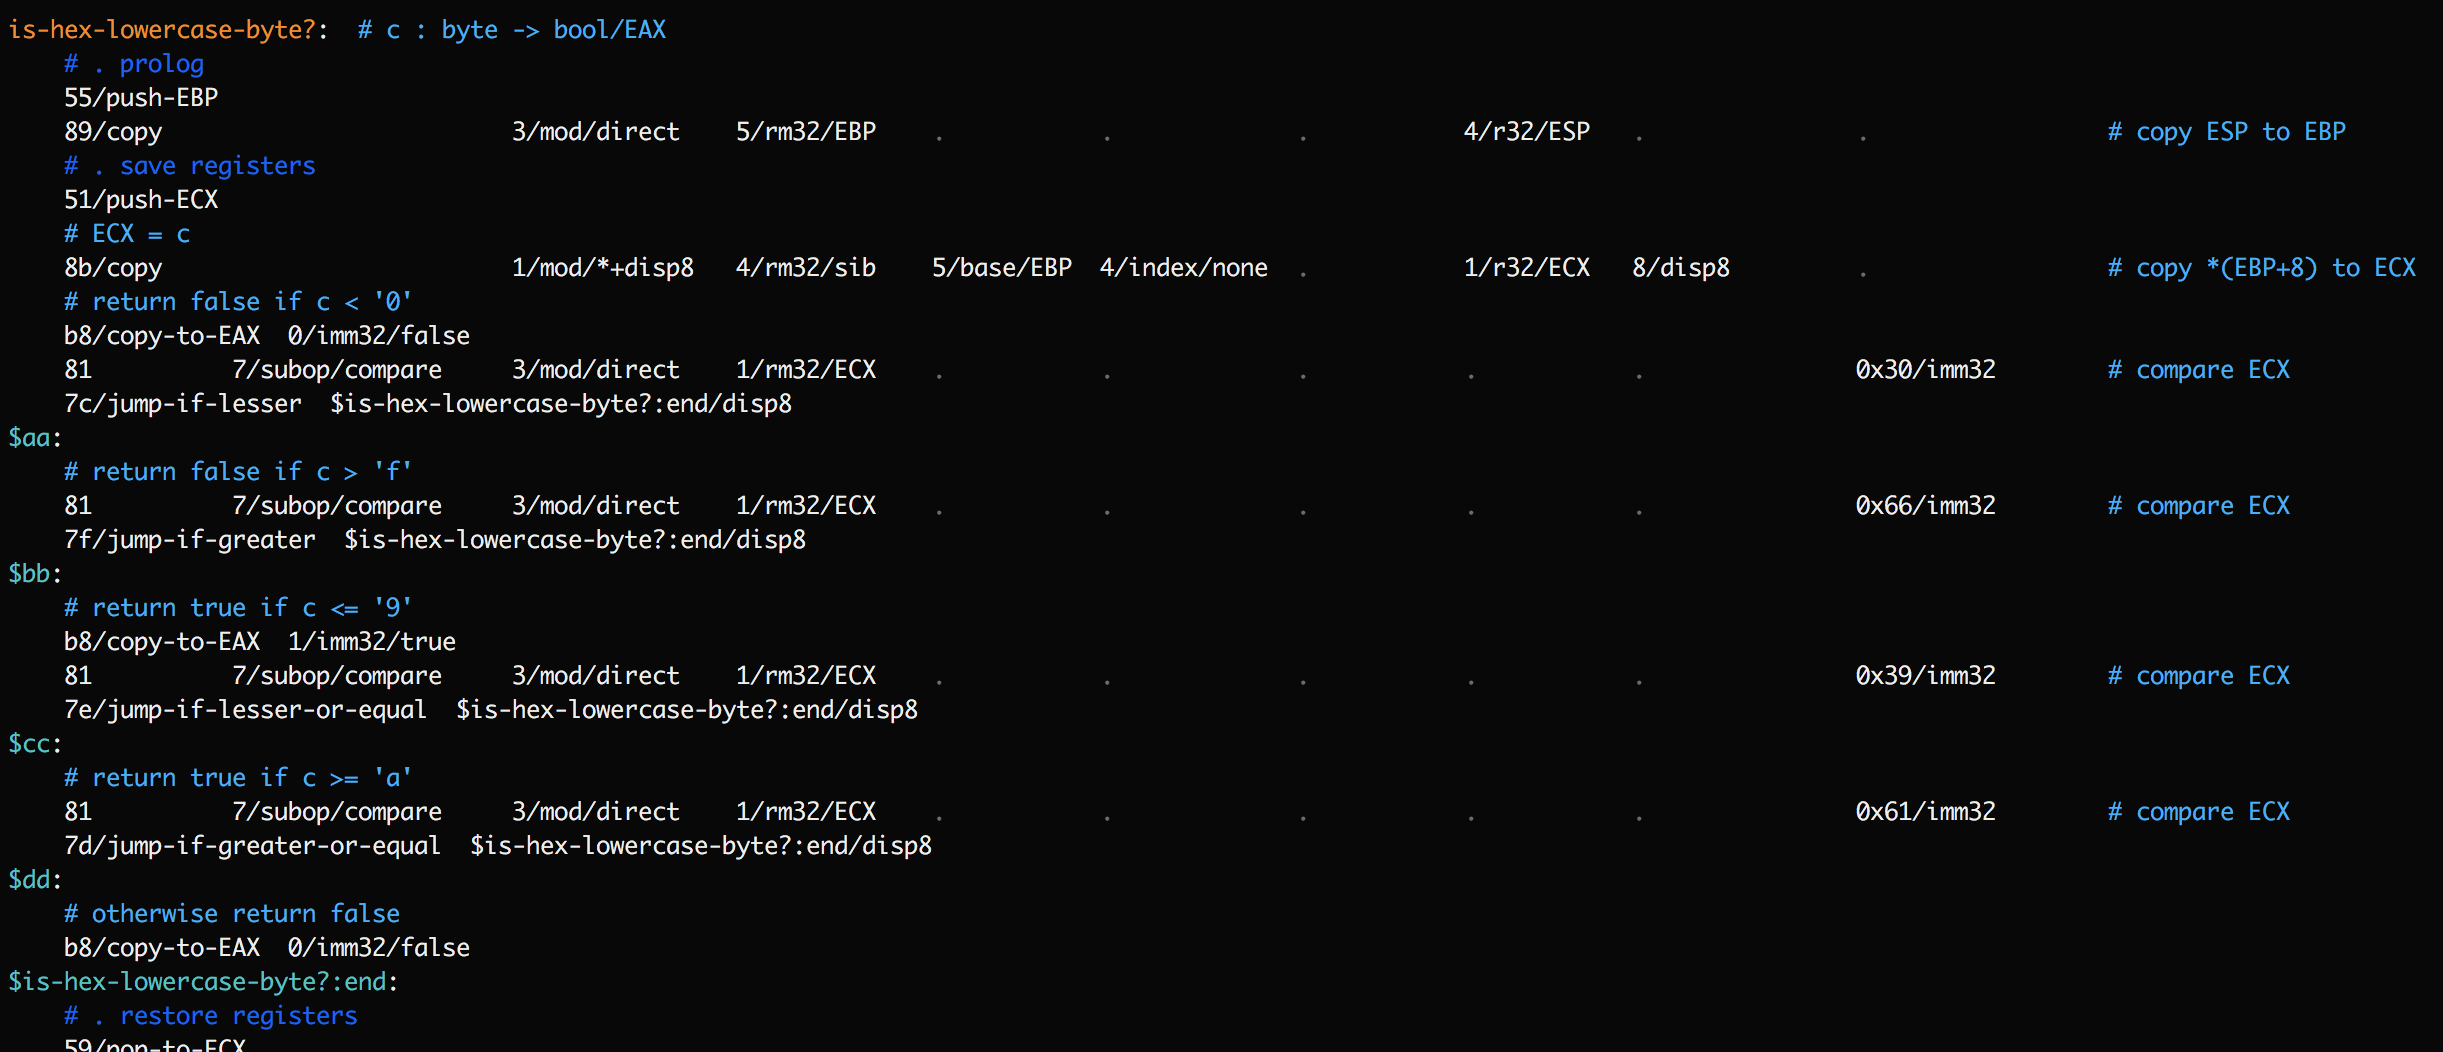
Now the trace should have a lot more detail on which of these labels was reached, and precisely when the exit was taken.
-
If you find yourself wondering, "when did the contents of this memory address change?",
subx runhas some rudimentary support for watch points. Just insert a label starting with$watch-before an instruction that writes to the address, and its value will start getting dumped to the trace after every instruction thereafter. -
Once we have a sense for precisely which instructions we want to look at, it's time to look at the trace as a whole. Key is the state of registers before each instruction. If a function is receiving bad arguments it becomes natural to inspect what values were pushed on the stack before calling it, tracing back further from there, and so on.
I occasionally want to see the precise state of the stack segment, in which case I uncomment a commented-out call to
dump_stack()in thevm.cclayer. It makes the trace a lot more verbose and a lot less dense, necessitating a lot more scrolling around, so I keep it turned off most of the time.
Hopefully these hints are enough to get you started. The main thing to remember is to not be afraid of modifying the sources. A good debugging session gets into a nice rhythm of generating a trace, staring at it for a while, modifying the sources, regenerating the trace, and so on. Email me if you'd like another pair of eyes to stare at a trace, or if you have questions or complaints.
SubX library
A major goal of SubX is testable wrappers for operating system syscalls. Here's what I've built so far:
-
write: takes two arguments,fands.sis an address to an array. Arrays in SubX are always assumed to start with a 4-byte length.fis either a file descriptor to writesto, or (in tests) a stream. Streams are in-memory buffers that can be read or written. They consist of adataarray of bytes as well asreadandwriteindexes into the array, showing how far we've read and written so far.
Comparing this interface with the Unix
write()syscall shows two benefits:-
SubX can handle 'fake' file descriptors in tests.
-
write()accepts buffer and its length in separate arguments, which requires callers to manage the two separately and so can be error-prone. SubX's wrapper keeps the two together to increase the chances that we never accidentally go out of array bounds.
-
read: takes two arguments,fands.fis either a file descriptor to read from, or (in tests) a stream.sis an address to a stream to save the read data to. We read as much data as can fit in (the free space of)s, and no more.
Like with
write(), this wrapper around the Unixread()syscall adds the ability to handle 'fake' file descriptors in tests, and reduces the chances of clobbering outside array bounds.One bit of weirdness here: in tests we do a redundant copy from one stream to another. See the comments before the implementation for a discussion of alternative interfaces.
-
stop: takes two arguments:edis an address to an exit descriptor. Exit descriptors allow us toexit()the program in production, but return to the test harness within tests. That allows tests to make assertions about whenexit()is called.valueis the status code toexit()with.
For more details on exit descriptors and how to create one, see the comments before the implementation.
-
... (to be continued)
Resources
- Single-page cheatsheet for the x86 ISA (pdf; cached local copy)
- Concise reference for the x86 ISA
- Intel processor manual (pdf)
Inspirations
- “Creating tiny ELF executables”
- “Bootstrapping a compiler from nothing”
- Forth implementations like StoneKnifeForth