|
|
||
|---|---|---|
| Home | ||
| TOSZ | ||
| screenshots | ||
| .gitignore | ||
| LICENSE | ||
| README.md | ||
| TempleOS.ISO | ||
| base.conf | ||
| install.sh | ||
| mount.sh | ||
| net-run.sh | ||
| net.conf | ||
| run.sh | ||
| sync.sh | ||
| text-run.sh | ||
| text.conf | ||
README.md
RIP Terry A. Davis (1969-12-15 to 2018-08-11)
Original scripts and basic implementation by tsoding, modified and expanded by myself.
ThemeManager.HC script created and submitted by Boketto.
All themes are approximations of their namesakes and are not 1:1 implementations. All documents and files contained in this repository are for educational purposes only. Theme contributions and alternative Windows-specific script contributions are welcomed.
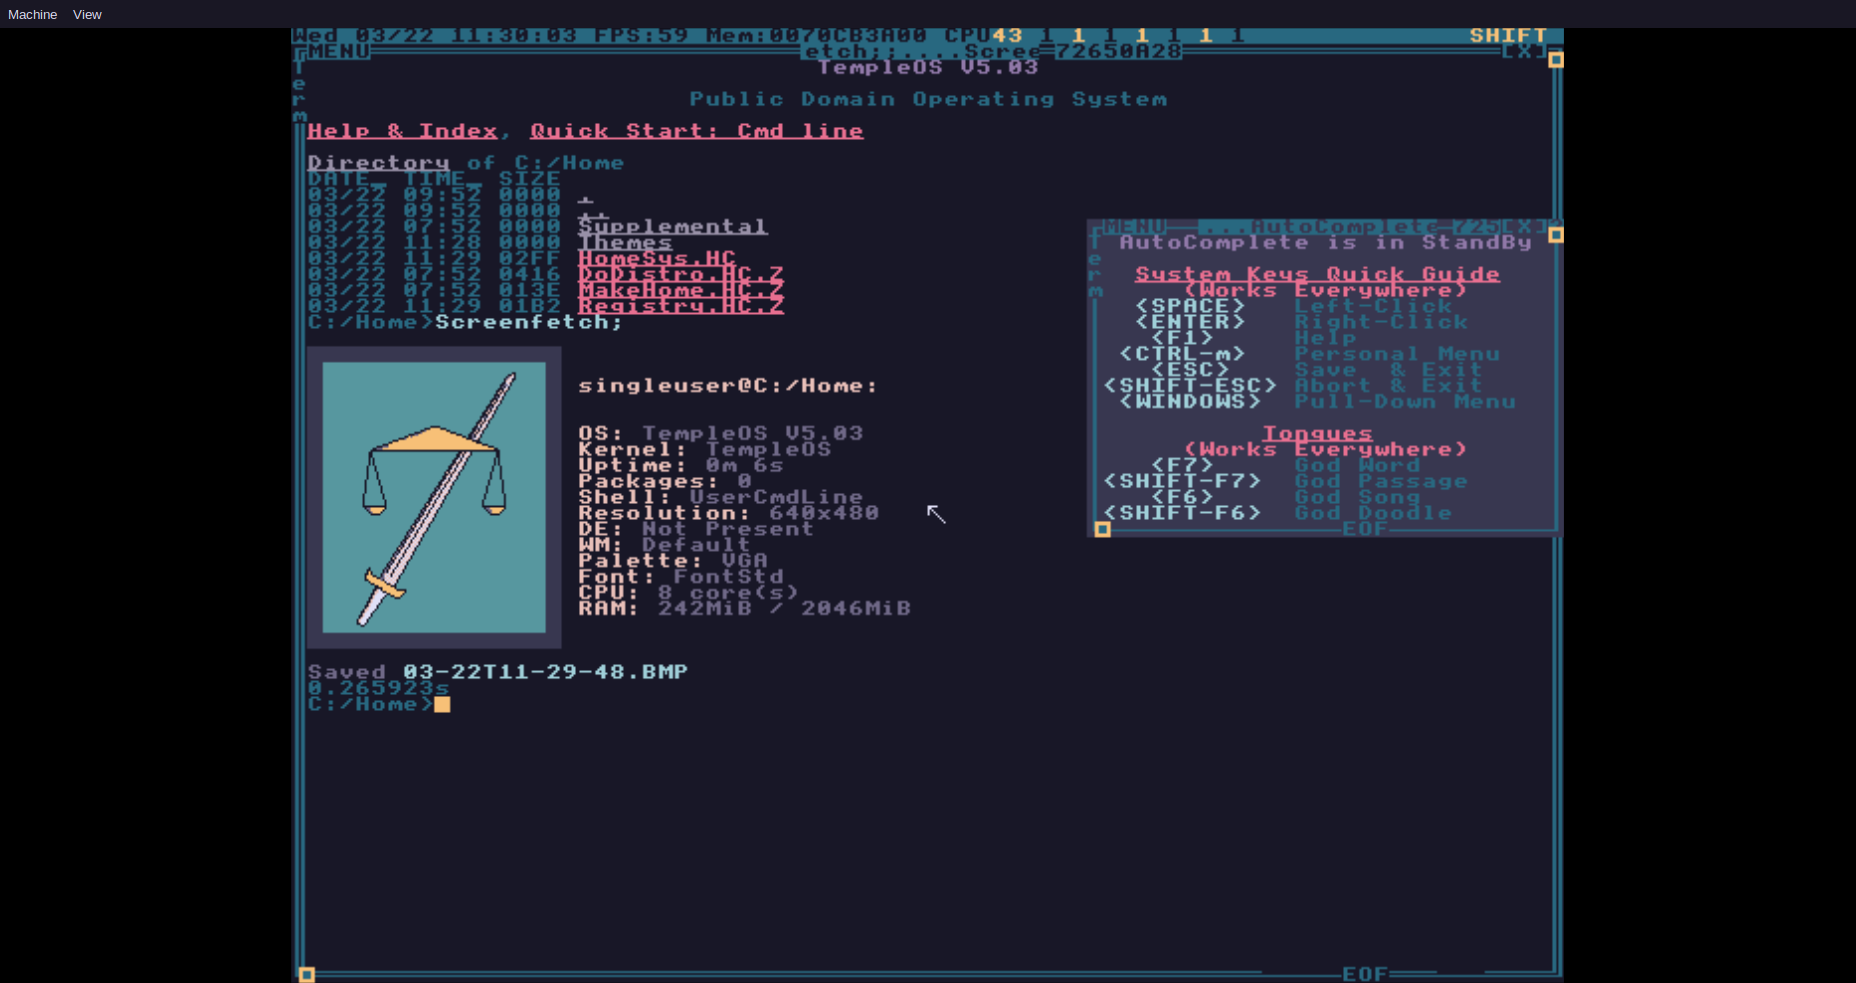
rosé pine theme shown; Screenfetch app must be installed separately (see Additional Software).
Table of Contents
Overview
This repository aims to assist with setting up a complete TempleOS environment via QEMU, including all files from Terry's supplemental .ISO.C files on templeos.org.
These scripts are intended for use on Linux machines; Windows users will need to use a tool like ImDisk Toolkit to mount the virtual TempleOS drive and copy files to/from the VM.
A few notes:
-
C:and::can be used interchangeably in TempleOS to refer to the root of theC:drive (with::referring to the root of the currently mounted disk) -
HomeSys.HCwas uncompressed from theHomeSys.HC.Zlocated inC:by using theTOSZtool to allow for easy external editing -
These scripts only affect the
C:drive of a TempleOS installation; theD:drive (and any additional drives created when installing theTinkerOS.ISO) are kept clean unless manually mounted and edited
Dependencies
The install.sh, mount.sh, run.sh, and sync.sh scripts use settings from base.conf; customize it to your liking. For example, you may want to add the following flag to enable sound: -audiodev alsa,id=snd0 -machine pcspk-audiodev=snd0. Replace alsa with pa for PulseAudio.
The net-run.sh and text-run.sh scripts use settings from net.conf and text.conf, respectively.
Usage
Clone this repository with the following command:
$ git clone https://github.com/bubstance/templeos
Installing the base system
$ ./install.sh <name>.img

Follow the installer's instructions, then close the VM.

$ ./sync.sh temple <name>.img

Syncs the contents of the included Home directory into the TempleOS image.
This will create a raw 512MiB (~537MB) virtual disk image, which is a safe minimum and should be more than enough for most use cases. You can adjust the size by editing the value of QEMU_IMG_SIZE in base.conf. No suffix indicates kibibytes, M is for mebibytes, G is for gibibytes.
The supplied base configuration runs TempleOS with 2GiB of RAM and as many CPU cores as your system has available. You can change this by editing the value of the -m flag in base.conf; the value is in MiB by default. 512MiB is the absolute minimum amount of RAM required for TempleOS to boot.
Running the VM
$ ./run.sh <name>.img

Boots the installed image.
Mounting the entire filesystem (optional)
$ ./mount.sh <name>.img
$ cd ./mnt/
This will mount the entirety of the TempleOS filesystem to a mnt directory created in the primary templeos directory. This can be useful for browsing through and editing files that are not contained in Home.
You can run the mount.sh script multiple times; it unmounts the image before trying to mount it again. The run.sh script also unmounts the image before running the VM. You usually don't have to unmount it manually, but if you need to you can always do umount ./mnt/.
Networking via net-run.sh (for Shrine images)
Sources net.conf and runs Shrine with networking enabled.
Displaying in text-only mode with text-run.sh (for TinkerOS images)
Requires installing TinkerOS and setting the graphical display mode to 17 during installation. Newer versions of the TinkerOS.ISO also allow for installation of base TempleOS in text-only mode. Choose 21 during installation.
Sources text.conf and runs TinkerOS/TempleOS in text-only mode.
Syncing Files
- NOTE: the
sync.shscript does not currently work with TinkerOS or ShrineOS; you need to usemount.shto interact with their filesystems
The subcommand (temple or host) denotes the target of the sync operation.
From Host to Temple
$ ./sync.sh temple <name>.img
From Temple to Host
$ ./sync.sh host <name>.img
Customization
Changing the theme
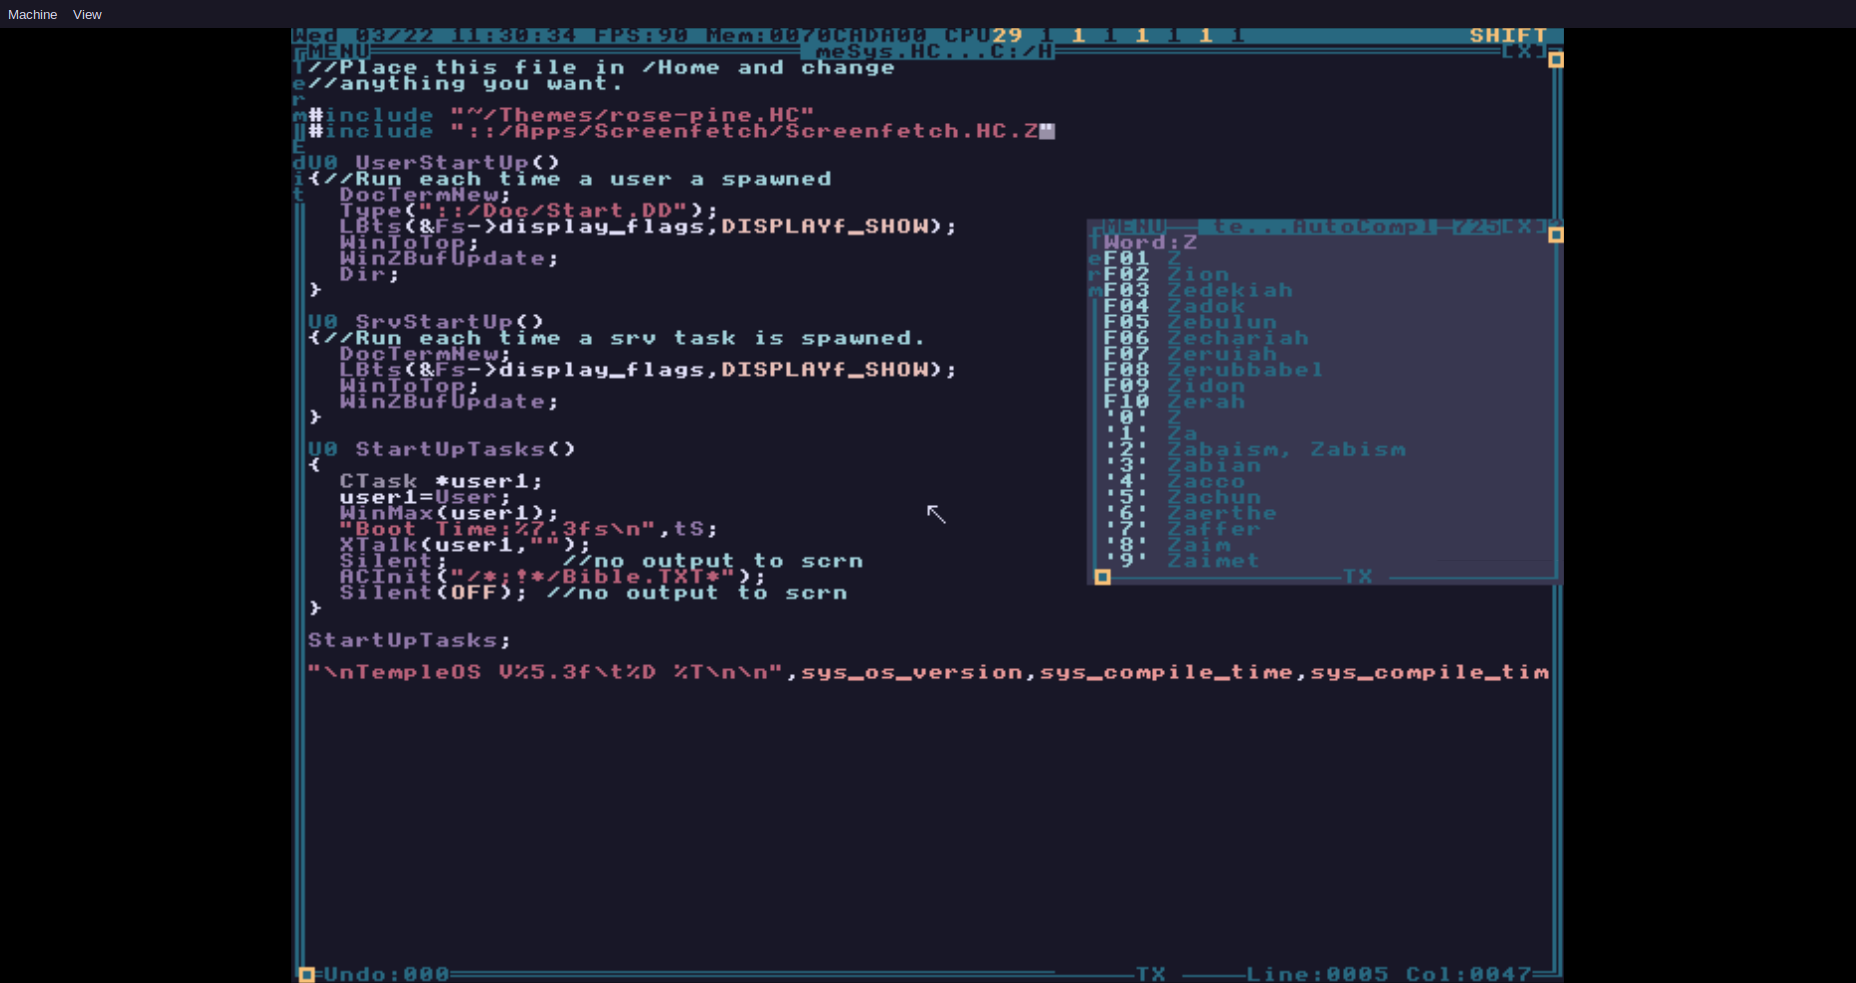
Themes are stored in the Themes folder in the Home directory. Edit SetTheme(); in HomeSys.HC file to source the theme of your choice on each boot. The default selection is gruvbox-light.
To change theme instantly, use ThemeManager.HC's SetTheme(); command (both created by Boketto).
#include "~/Themes/ThemeManager.HC";
SetTheme(); // no arguments to list all available themes
SetTheme("nord"); // name an available theme to set it
SetTheme("all"); // "all" cycles through all themes
Current theme choices are:
-
darkandlight
-
base,moon, anddawn
-
darkandlight
Installing a different fork of TempleOS
Change the TEMPLEOS_ISO variable in base.conf to either TinkerOS.ISO or Shrine.ISO, then use the install and run scripts as described above.
Additional Software
-
Try out some TempleOS forks! There's
TinkerOSfrom tinkeros/TinkerOS,Shrinefrom minexew/Shrine, andZealOSfrom Zeal-Operating-System/ZealOS. -
Check out Jeff Irwin's temple-viewer STL viewing application! It's really neat.
-
You can install the
Screenfetchapplication by doing the following:-
Download
Screenfetch.ISO.Cfrom the cia-foundation -
Remove the
.Cextension and run QEMU with the-cdromflag and the location of the.ISO. If you move theScreenfetch.ISOinto thetempleosdirectory, the full command would be something like:
qemu-system-x86_64 -display gtk,zoom-to-fit=on -rtc base=localtime -cdrom Screenfetch.ISO -enable-kvm -m 2048 -smp $(nproc) -hda custom.imgThis will start TempleOS (or a fork that you installed) with the
Screenfetch.ISOmounted to theT:drive-
Copy the contents of the auto-mounted
.ISOin TempleOS by performing the following command:CopyTree("T:", "::/Apps/Screenfetch");This will automatically create the folder
C:/Apps/Screenfetchand populate in with the contents of the.ISO -
Add another
#includeto yourHomeSys.HCthat sources"::/Apps/Screenfetch/Screenfetch.HC.Z" -
You will now have access to the
Screenfetch;command on every subsequent boot -
**NOTE** For ShrineOS running with networking, all you need to do is
pkg-install screenfetchand then source in yourHomeSys.HCas above
-
Bonus Tips
-
To force TempleOS (and ShrineOS) to run at 60FPS, edit the values of
WINMGR_FPSandWINMGR_PERIODinC:/Kernel/KernelA.HH.Zat lines1478and1479to60000.0/1001and1001/60000.0, respectively (this is just changing the3to a6). Jumping to a line can be done quickly by using the keyboard shortcut<Ctrl+g>, entering the desired line number, then pressing<Esc>- **NOTE** Changing the framerate does not seem to work in TinkerOS
-
If you install
TinkerOS.ISOand set at least one of your drives' graphics mode to15during installation, you can then change the-display gtksetting inbase.confto-display cursesand get a nice text-only version that works inside of a terminal or TTY -
You can use the
TOSZapplication made by Terry to uncompressHC.Zfiles (Linux only)-
chmod +x make_tosz, then run it in the same directory asTOSZ.CPPto make theTOSZexecutable -
Run
TOSZon the file you wish to uncompress (for example:./TOSZ -ascii MakeHome.HC.Z)
-
-
Here's handy tip from Jeff Irwin on changing the default keyboard layout to Dvorak (via Reddit):
Open up
C:/Kernel/SerialDev/Keyboard.HC.Zwith the editorEd. The first several lines are like this:asm { NORMAL_KEY_SCAN_DECODE_TABLE:: DU8 0,CH_ESC,"1234567890-=",CH_BACKSPACE,'\t'; DU8 "qwertyuiop[]",'\n',0,"as"; DU8 "dfghjkl;'\`",0,"\\zxcv"; DU8 "bnm,./",0,'*',0,CH_SPACE,0,0,0,0,0,0; DU8 0,0,0,0,0,0,0,0,0,0,'-',0,0,0,'+',0; SHIFT_KEY_SCAN_DECODE_TABLE:: DU8 0,CH_SHIFT_ESC,"!@#$$%^&*()_+",CH_BACKSPACE,'\t'; DU8 "QWERTYUIOP{}",'\n',0,"AS"; DU8 "DFGHJKL:\"~",0,"|ZXCV"; DU8 "BNM<>?",0,'*',0,CH_SHIFT_SPACE,0,0,0,0,0,0; DU8 0,0,0,0,0,0,0,0,0,0,'-',0,0,0,'+',0;Keep the
asm {part, but replace the QWERTY tables with this:NORMAL_KEY_SCAN_DECODE_TABLE:: DU8 0,CH_ESC,"1234567890[]",CH_BACKSPACE,'\t'; DU8 "',.pyfgcrl/=",'\n',0,"ao"; DU8 "euidhtns-\`",0,"\\;qjk"; DU8 "xbmwvz",0,'*',0,CH_SPACE,0,0,0,0,0,0; DU8 0,0,0,0,0,0,0,0,0,0,'-',0,0,0,'+',0; SHIFT_KEY_SCAN_DECODE_TABLE:: DU8 0,CH_SHIFT_ESC,"!@#$$%^&*(){}",CH_BACKSPACE,'\t'; DU8 "\"<>PYFGCRL?+",'\n',0,"AO"; DU8 "EUIDHTNS_~",0,"|:QJK"; DU8 "XBMWVZ",0,'*',0,CH_SHIFT_SPACE,0,0,0,0,0,0; DU8 0,0,0,0,0,0,0,0,0,0,'-',0,0,0,'+',0;If you're copy/pasting, great! If you're typing it manually, be careful to escape the double quote in the shift table like
\". There's a Ctrl key table too which I haven't bothered editing yet.Finally, recompile with
BootHDIns;andReboot;
This would, of course, also apply to any other keyboard layout you wish to map (AZERTY, QWERTZ, etc.)